Custom Search
Showing posts with label Create. Show all posts

Monday, September 6, 2010

How to Create Newspaper Layout In Photoshop

This tutorial will show you how to create an image that will look like a scanned newspaper page.


Newspaper Layout In Photoshop


Step 1. Create a new document, size 630x900 and fill it with it a light, warm gray (color code #e4e4e4).

Step 2. To make the final result make more realistic, it’s necessary to mimic the way you can see the writing on the back page on a real newspaper.

To achieve this effect, open an image of a newspaper page you can find on the Internet (I chose this one), go to Image-> Rotate Canvas -> Flip Canvas Horizontal and then copy/paste it over the new document you just created. Set its opacity to 5%, so that the writing is only a bit visible.

Newspaper Layout In Photoshop

Step 3. Newspaper articles often contain pictures, so I opened this one and resized it to 35%, and I placed it on the left like this:

Newspaper Layout In Photoshop

Step 4. To convert the image to black and white, the best method is to go to Image -> Adjustments -> Channel Mixer… tick Monochrome and leave all the other settings as default.

Newspaper Layout In Photoshop

Step 5. In order to create the headlines, I used Century Old Style Std, Italic, size 40pt and 24pt respectively. You may use any other font that is very legible and simple.

Newspaper Layout In Photoshop

Step 6. To create the subtitles, I used Century Old Style Std, Bold, size 18pt. I left some space between them and the picture, and the headlines, in order to achieve an elegant, uncluttered look.


Don’t worry if the text you’ve done until now is not properly aligned. You can easily fix that later.

Step 7. Now it’s time to create the content of the news article. You need to create a text box: using the Type Tool, click on the desired starting point of the text box and drag down to create a rectangle.

Newspaper Layout In Photoshop

Though it’s not visible in the screenshot above, the text box doesn’t go all the way to the bottom of the page. I’ve left a blank edge on the bottom of the page, because we’re later going to add the date and day of the week there, just like on genuine newspapers.

Step 8. Paste some text of your choice into the text box you’ve created (my source was Wikipedia). The font I used is Century Old Style Std, Regular, 14pt.

Newspaper Layout In Photoshop

Notice that I’ve used a Sans Serif font. Because of their high legibility, most magazines and newspaper articles use Sans Serif fonts for the main body of text.

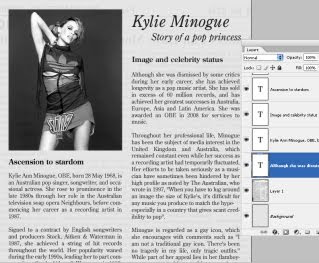
Step 9. Create a second text box as shown at step 7 and paste some text, using the font at step 8.
Newspaper Layout In Photoshop

Step 10. The final step is to create a text box and add some text in the lower part of the page. I used the font Century Old Style Std, Regular, 12pt.

Newspaper Layout In Photoshop

In order to verify and align the way the text and pictures fit on the page, go to View -> Show -> Grid. To change the position of a certain element, use the left and right arrow keys, or the Move Tool.


The final result:


Newspaper Layout In Photoshop

read more...

Friday, May 7, 2010

How To Create Night Vision Effect In Photoshop

In this tutorial you will learn how to create a night vision effect in Photoshop using the hue and saturation adjustments, blur filter and the burn tool. The night vision effect in this tutorial gives the result of looking through night vision goggles. I have used a free stock image which can be found at sxc.hu.


Night vision effect in Photoshop

Step 1

Open an image in Photoshop. It’s best to use an image which contains some scenery such as buildings or landmarks.


Step 2

Duplicate the background layer by pressing Ctrl + J on the keyboard. Then select Image > Adjustment > Hue/Saturation. Check the Colorize box at the bottom of the dialog window and then give your image a green colour. I have used the following settings, but you can use whatever setting you wish. I have set the hue to 124, the saturation to 43 and the lightness to -36.


Step 3

Add some noise to your image by selecting Filter > Add Noise. I have only added a small amount of noise to my image. The amount I used is 10% and the distribution is uniform.


Step 4

Take the burn tool with the range at Midtones and the exposure at 64%. And paint around the edges of the image. Apply about 5 -6 layers of burn around the edges, so you get a slightly blacken colour.


You should now have a night vision effect.


read more...

Friday, April 30, 2010

Realistic Paper Texture in 5 Minutes

In this quick tip tutorial, we will learn how to create a realistic paper texture from scratch in just 5 minutes. To do this we will use some simple filters and effects. Let’s get started!

Realistic Paper Texture in 5 Minutes

Step 1

Create new file 1280 x 1024 px. Create a rectangular selection in the center of the image, hit Q to enter quick mask mode. Go to Filter > Pixelate > Crystallize, use small cell size and click OK. Hit Q again to return to normal mode. Hit Cmd+shift+alt+N to create a new layer. Press D then Cmd+Delete to fill selection with white. To remove selection press Cmd+D.


Realistic Paper Texture in 5 Minutes

Step 2

Activate the burn tool with exposure 20%. Paint the paper until it looks dark and dirty. Go to Filter > Texture > Texturizer, use Texture: Canvas and click OK.


Realistic Paper Texture in 5 Minutes

Step 3

Double click the paper layer to open the Layer Styles dialog and activate the Drop Shadow effect. Don’t worry with the settings, just click OK. This shadow is very flat and unrealistic, but we’ll fix it.


Realistic Paper Texture in 5 Minutes

Step 4

From the Layers panel, right click Drop Shadow and choose Create Layer. This step will separate the Drop Shadow from the paper.


Realistic Paper Texture in 5 Minutes

Step 5

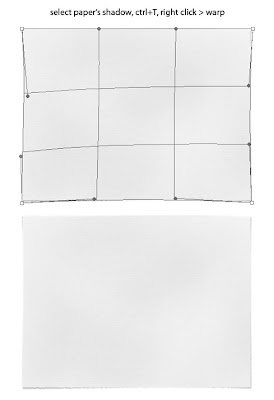
Select the shadow layer, hit Cmd+T to transform it. Right click it and choose Warp. Move the handles until the shadow looks irregular, just like a real one.


Realistic Paper Texture in 5 Minutes

Step 6

Activate the Gradient Tool, in the option bar and choose Linear and Mode: Difference. Create a random gradient, from top to bottom, bottom to top, left right, and right to left. Just go crazy!


Realistic Paper Texture in 5 Minutes

Step 7

Go to Filter > Stylize > Emboss. Hit Cmd+L and move the white and black sliders to the middle.


Realistic Paper Texture in 5 Minutes

Step 8

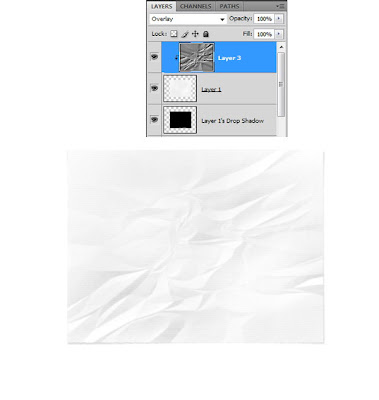
Hit Cmd+alt+G. Change blending mode to Overlay.


Realistic Paper Texture in 5 Minutes

Conclusion

That’s it! You can turn this into a thin paper by lowering its opacity. Below is the final paper on a wood texture. Click here or click on the image to see it in full size.


Realistic Paper Texture in 5 Minutes

Source : psd.tutsplus
read more...

Tuesday, March 2, 2010

Photoshop Brushes - How To Create Cute Faces On Fruits

Step 1 – Open an image of a fruit in Photoshop

Choose File > Open, browse for the image file, then click OK.


Step 2 – Create a new layer

Choose Layer > New Layer to create a new layer. This layer will hold the image of the cute face.


Step 3 – Choose the brush

Make sure that you’ve loaded the brushes into Photoshop. Select the Brush tool then right click anywhere on the document window to see the list of brushes. Pick the face that you’d like to use.


Step 4 – Apply the cute face

Paint the cute face on the fruit. Use the transform tools (Edit > Transform) if you like to distort the face.


Step 5 – Blend the face into the fruits texture

Choose Layer > Layer Style > Blending Options. On the bottom of the window, hold the alt key then drag the white input slider towards the left until the face looks like it is drawn on the fruit. Click Ok when done.


Final Results


[VIA]
read more...

Illustrator - How To Make A Custom Brush

It’s really a lot easier than you would expect. This tutorial was requested by many of my readers after I posted this Free set of 35 Abstract Illustrator Brushes. The possibilities are endless as far as brush making goes in illustrator, but I wanted to get you started in the right direction and let you take it from here. (The purpose is to tease you, so you want to try it on your own!)

Illustrator - How To Make A Custom Brush

It would actually be pretty hard to make this tutorial any more detailed. Making custom Illustrator brushes couldn’t be easier. However, there are a couple things you do need to know first. There are 4 types of brushes that you can create in Illustrator. (Calligraphic, Art, Scatter, and Pattern) I will be showing you how to make an Art Brush. I haven’t explored the other 3 in as much detail, but as soon as I have I will post about it. For now, I will show you how to make an art brush, and you can experiment with the other brush types in the same fashion, the only differences are settings, and how the brushes act when applied.

Make a Custom Illustrator Art Brush:

First, open a new Illustrator document and make any shape that your heart desires. You can literally make ANY shape into a brush, even a square if you feel like it. Here’s what I made. A couple of bars and some blocks scattered about. There is no need to worry about shapes at this point because once you try this a few times, you will get an idea of how the shapes will effect your brush.
Illustrator - How To Make A Custom Brush

Now select all of the shapes that you want to be a brush and in your Brushes palette, click on the little arrow in the upper left, and select “New Brush.”

Illustrator - How To Make A Custom Brush

You will get the option to choose 1 of 4 brush types. Choose “Art Brush” and click OK.
Illustrator - How To Make A Custom Brush

Now you should be in the Brush Options. IMPORTANT: Make sure you select “Tints” as the Colorization Method. This allows you to change the color of the brush as a stroke color. If you don’t select Tints, your brush will always be the color it is when you create it. There are lots of other settings you can play with here, including the direction of the brush stroke. Choose your settings and click OK.
Illustrator - How To Make A Custom Brush

You should now see your new Custom Brush in the Brushes palette.
Illustrator - How To Make A Custom Brush

Now create a shape to test your brush. I used a circle, like below:
Illustrator - How To Make A Custom Brush

Now make sure you have the stroke selected in the tools palette, and click on your Custom Brush in the Brushes palette to apply it to the circle to see what you get:
Illustrator - How To Make A Custom Brush

Custom Brushes are an easy way to get shapes that would have otherwise taken you hours to draw by hand. Now that you have your brush, you can start applying it whenever you want, and adjust the stroke size to get the effect/shapes you want. In the image below, all I did was use the same brush I just created, duplicated it, overlapped it, and adjusted scale, colors and stroke sizes. You can make multiple brushes in order to get way more complex, and the more you try it, the better you get. Seriously, this took about a minute with one brush (made from simple rectangles!). Imagine what you can do if you spend some time experimenting?
Illustrator - How To Make A Custom Brush


[VIA]
read more...