Custom Search
Showing posts with label cool. Show all posts

Sunday, May 27, 2012

How To Create Media Player Design In Photoshop

In this tutorial we’ll teach you how to create a Media Player Interface in Photoshop.

Step 1

How To Create Media Player Design In Photoshop

Create a new file 398×398 pixels. Using the Layer Style on the background select Gradient overlay and make the colors #016497 and #6bd3f5.

Create a new file, with the Paint Bucket tool fill the layer black. Go to Filter > Noise > Add Noise (make it 20%). Make the layer opacity 14%.

How To Create Media Player Design In Photoshop

Select the Round Rectangle Tool and create the main shape for the Media Interface. Double click on the layer to bring up Layer Style, go into Gradient Overlay and make it these colors: #000000 and #2e2e2e. Select Stroke and make the size 1px and color #000000.

How To Create Media Player Design In Photoshop

Hold down the ctrl key and Layer Thumbnail containing the box, this will highlight the box. Create a new layer and fill the box shape it white, press the right key once to move over the highlighted shape and press delete. You should have a thin line on the side of the box. Get the eraser tool with the soft edge and make the opacity 60%. Lightly erase the top and bottom edge of the line to make a shiny edge effect.

How To Create Media Player Design In Photoshop

Do the same step to the right side of the box.

How To Create Media Player Design In Photoshop

Select the Rectangle Tool and create a box in the middle of the previous box like above. Open up the Layer Style to the layer, select Gradient overlay and make the colors #000000 and #2e2e2e.

How To Create Media Player Design In Photoshop

Like the previous step do the white lines to this new square layer.

Step 2

How To Create Media Player Design In Photoshop

Select the rounded rectangle tool and draw a rectangle. Holding down the ctrl-key, press down on the bottom right corner and move to the right. Do the same move with the bottom left side of the other side. Make sure the bottom is even.


Holding down the ctrl-key and layer box selecting the rectangle shape. Go to Select > Modify and Expand by 2 pixels.

How To Create Media Player Design In Photoshop

On the new layer open up the Layer Style > Select Gradient and make the colors from bottom to top #454545 #626262 #646464 & #222222. Select the Stroke tool make the size 1px, color #oooooo and opacity 71%.

How To Create Media Player Design In Photoshop

Holding down the ctrl-key select the rectangle box layer to select the shape. Create a new file to go underneath the rectange shape and fill it #FFFFFF. Press ctrl and press the up arrow once to make it viewable on top of the rectangle shape. With the eraser tool on a 60% opacity, slightly erase the edges.

How To Create Media Player Design In Photoshop

With the Zoom Tool enlarge the panel area. Select the line tool, make it 1px. With the colors black and white draw 2 lines side by side. Rasterize both layers and merge them into each other (press ctrl E on the top layer).

How To Create Media Player Design In Photoshop

Using the eraser tool slightly erase the top and bottom of the line.


Zoom out and duplicate layer to make 4 lines.

How To Create Media Player Design In Photoshop

Using triangle shapes and square shapes create little icons for the media player. For each shape make the gradient #385870 #bbdbf3 and 45657d.

How To Create Media Player Design In Photoshop

Select the rounded rectangle tool and make a shape like the one in this picture. Go into Layer Styles > Gradients Overlay and make the colors #4daaf2 and a3d7ff. Select stroke, make it 1px and the color #000000.

How To Create Media Player Design In Photoshop

Holding down the ctrl key click on the rectangle layer to select the shape.


Click on the Elliptical Marquee Tool and while press ALT key select the area of the rectangle you wish to go away to make it look like the shape in this image.


Make a new layer and fill in the shape white, then make the opacity for that layer 11%.

How To Create Media Player Design In Photoshop

If you wish to put a scene from a movie in the player, get a image you. Place it in the centre of the screen, hold down on the ctrl key and select the rectangle screen shape.Selecting the image layer press ctrl+x, then delete the image layer. Press ctrl + P which should paste the new image on a layer. Place the image underneath the reflected shape and make the opacity 78%.

How To Create Media Player Design In Photoshop

Zoom in to the image, select the color #0a4579 and with the pencil tool draw a speaker shape.


Select the brush tool and with the same color draw 2 circles, then copy and paste the circles to make more. Make sure everything is even.

How To Create Media Player Design In Photoshop

Put all the media interface files (excluding the background) in one folder. Duplicated the folder, right click on the new folder and select Convert to Smart Object. Right click on the file again and press Rasterize Layer.

How To Create Media Player Design In Photoshop

With the duplicate layer selected press ctrl+T (make sure when you do this the Marquee Tool is selected), pull down the image to make it look like the screenshot above.

Make the layer opacity 49% and select the eraser tool. With a soft edged eraser at 70% erase the bottom of the image.

How To Create Media Player Design In Photoshop

Lastly with the layer still selected go to Filter > Blur > Blur to make the image slightly blurry. Do this a number of times to get your desired effect.


Here’s the final Result


read more...

Monday, July 11, 2011

Create A Glittering Gold Party Text Effect

This tutorial explains how to use Photoshop layer styles, filters, and brushes to create an awesome sparkly text effect.

Step 1

Create a new document that is 1350 x 1000 px. Set the Foreground color to #525252, and the Background color to #0d0d0d. Create a Radial Gradient from the center of the document to one of it corners making sure that you selected Foreground to Background gradient preset.

Glittering Gold Party Text  Effect

Go to Filter > Noise > Add Noise. Set the Amount to 5, the Distribution to Uniform, and check the Monochromatic box.

Glittering Gold Party Text  Effect

Step 2

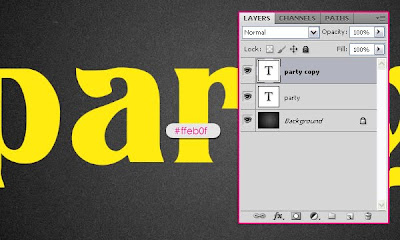
Create the text using the color #ffeb0f. The font used is Titania and the size is 377px. Duplicate the text layer so you have two copies.

Glittering Gold Party Text  Effect

Double click on the copy text layer (the one on the top) to apply the following styles:

- Drop Shadow: Change the color to #383838, and the Size to 10.

Glittering Gold Party Text  Effect

- Inner Shadow: Change the color to #625841, the Size to 13, and the Contour to Half Round.

Glittering Gold Party Text  Effect

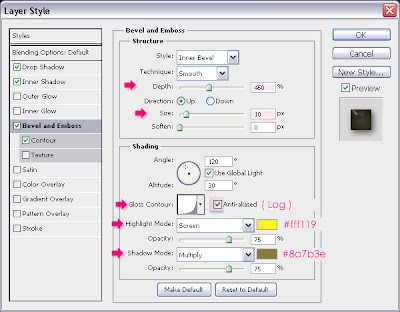
- Bevel and Emboss: Change the Depth to 450, the Size to 10, the Gloss Contour to Log, and check the Anti-aliased box. Also, change the Highlight Mode color to #fff119, and the Shadow Mode color to #8a7b3e.

Glittering Gold Party Text  Effect

- Contour: Just check the Anti-aliased box

Glittering Gold Party Text  Effect

This is what the text should look like:

Glittering Gold Party Text  Effect

Step 3

Press the Ctrl/Command key, and while still pressing, click on the text layer thumbnail (icon) to create a selection.

Glittering Gold Party Text  Effect

Set the Foreground color to #7d6905 and the Background color to #d3c614. Create a new layer on top of all layers and call it “texture”. Fill the selection with the Foreground color, and press Ctrl/Command + D to get rid of the selection.

Glittering Gold Party Text  Effect

Step 4

Now, we are going to use a couple of filters to create the sparkly texture. Start by going to Filter > Sketch > Notepaper. Change the Image Balance to 25, the Graininess to 10, and the Relief to 11.

Glittering Gold Party Text  Effect

Go to Filter > Texture > Stained Glass. Change the Cell Size to 2, the Border Thickness to 4, and the Light Intensity to 1. The Light Intensity property adds brightness to the center of the texture, so you can increase the value if you want more brightness in the center.

Glittering Gold Party Text  Effect

Finally, go to Filter > Stylize > Glowing Edges. Change the Egde Width to 2, the Edge Brightness to 10, and the Smoothness to 5.

Glittering Gold Party Text  Effect

Change the “texture” layer’s Blend Mode to Overlay.

Glittering Gold Party Text  Effect

That’s it for the text effect. Next, we’re going to add some sparkles using the Brush tool.
Step 5

Open the Brush panel (Window > Brush), and choose a hard round brush. Change the size to 10px, and set the Spacing to something around 322%.

Glittering Gold Party Text  Effect

Under Shape Dynamics, change the Size Jitter to 100%, the Roundness Jitter to 62%, and the Minimum Roundness to 25%.

Glittering Gold Party Text  Effect

Under Scattering, Change the Scatter value to 431%.

Glittering Gold Party Text  Effect

Finally, under Color Dynamics, change the Foreground/Background Jitter to 100%, and the Brightness Jitter to 50%. This will give the sparkles different brightness and color values.

Glittering Gold Party Text  Effect

Step 6

Right click on the text layer, and choose Create Work Path.

Glittering Gold Party Text  Effect

Make the color #d3c614 the Foreground color, and change the Background color to #ffff08. Create a new layer on top of all layers and call it “sparkles”, and grab the Direct Selection Tool.

Glittering Gold Party Text  Effect

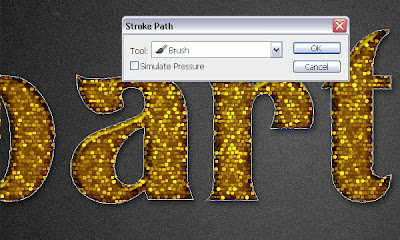
Right click on the path, and choose Stroke Path.

Glittering Gold Party Text  Effect

Choose Brush from the Tool drop down menu, and make sure the Simulate Pressure box is un-checked.

Glittering Gold Party Text  Effect

This will stroke the path with the brush you’ve just created.

Glittering Gold Party Text  Effect

Change the “sparkles” layer’s Blend Mode to Linear Light.

Glittering Gold Party Text  Effect

Step 7

The last thing we’re going to do is add more shadow to the text, so that it blends more with the background, and has more depth. To do that, Double click on the original (bottom) text layer, un-check the Use Global Light box (as we want to change the direction of the shadow), and change the Angle to -20. Also, change the Distance to 8, and the Size to 10.

Glittering Gold Party Text  Effect

Change the Fill value of the original text layer to 0, so that only the shadow is visible.

Glittering Gold Party Text  Effect

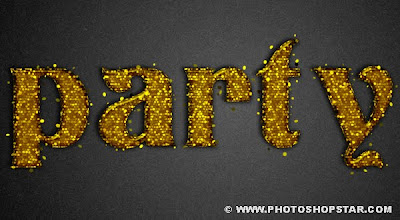
Final Image

Glittering Gold Party Text  Effect


Source
read more...