
An introduction to Gradient Mesh tool
Gradient Mesh tools are used to create a single multicolored object on which colors can flow in different directions , the color transitions achieved are smooth running from one color to another.
Once a mesh object is created you can easily change its color characteristics i.e. shade by adjusting each point of the mesh object . Meshes can be created on any of your vector , eps objects with the exception of compound paths and text objects until expanded.
You can not apply meshes to Jpeg , giff or other raster objects imported to your artwork.
In the following tutorial we will give an introduction to using of mesh tool.
Step1
Creating the Shape
Activate your smart Guides before you start Ctrl+U or view > Smart Guides
Start off by selecting the Ellipse tool(L) and Draw a perfect circle by pressing shift while you create
Step 2
Creating Mesh
select mesh tool and click exactly in the center of the circle your smart guide will help you identify that. this is your first mesh division. Our object is to create a cartoonish face i would like to divide the the circle as a face and will shade two sides as cheeks.

Step 3
Division of the shaded areas.
similarly click and divide the right side and the left side of the circle with clicking on the line running horizontally.

and further divide by clicking similarly on vertical line. The shape of the circle will look something like this.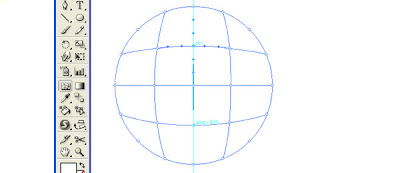
Switch your tool to direct selection tool (A) and select all the nodes on the outer anchor points of the circle which you can do by keeping shift key pressed. when selected it will look something like this
Step 4
Shading your work
open up your color palette F6 and drag to a light shade of blue you will see the effect changing in your shape

If you miss an anchor point don’t worry just drag the color from your palette and drop over the missed anchor point
here is how it will look like at this point
 'select the middle anchor points as show below and pick up a shade of pink
Step 5
Creating face elements
As the object over here is to create a face you can easily select any anchor point and using its handles change the direction of the color blending , here a chin is required so i will just play around a little with the lower anchor point in the middle. and shift it down a bit

be careful not to un-blend the perfect blending or your chin will have a cut!
Draw a few face elements.

using similar technique i will draw now eyes. Here are some steps i used to create a set of Cartoonish looking eyes
Place them over your face
here is the finished face you can save it as a symbol and place it over any interesting background . This character was created for a children’s program here is a preview of one of the screen shots of the final scene.
[Via]
0 comments: on "Illustrator Tutorial :- How To Use Mesh Tool"
Post a Comment