
Split Frequency Healing is a method that you can apply in Photoshop that will allow you retouch photos without affecting the photo’s relevant tone or texture. In this tutorial, commercial retouch artist, Daniel Meadows, who has worked for clients such as Harper’s Bazaar, Elle, Marie Claire, Chanel, and L’Oreal Paris, will elucidate this technique and how it can be used in your workflow.
Final Image

Take a look at the picture which we are using for this tutorial. Client might give you a typical example of markup image below. It might be a jpeg or scan of a pen-annotated print or just a set of directions or suggestions, but ultimately you’ll be expected to deliver on a set brief.

We have instructions to clean up the image, a little liquefy for a more pleasing curve to the back and waist, and to remove the purple-blue tone from the model’s legs. I’ll cover the techniques you’ll need to complete the shot over the course of several tutorials. Remember not to deviate too far from what your client is asking for, run it by them first. If you think a background color change is really going to make the subject pop, try discussing your ideas, especially if it’s for a portfolio project. If it’s a commercial or editorial job however and the art director wants neutral white, he or she of course, gets white.
There are quite a few ways to achieve a similar result in Photoshop, and I’ll be going through a number of them, often focusing on one in particular and giving a couple of alternatives you might want to try.
The first step we’re going to follow in completing this shot is the healing, the ‘basic cleanup.’ For this we’re going to be mostly using the clone stamp (S), but we’ll do it a little differently to the way the software intended. Be sure to start off using the key commands for your tools, you’ll save yourself a lot of time in the long run. When you’re trying to meet an unreasonable deadline and your left hand is bringing up every tool and command without giving it a thought you’ll thank me for it. Take a look at the look at the shot we have to work with.
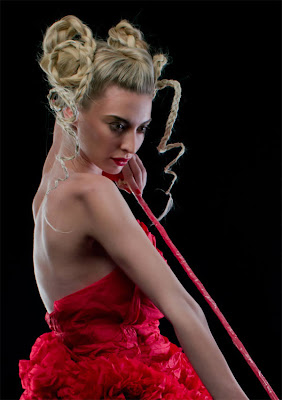
The lighting’s a blessing, the well defined shadows and highlights give us a great guide to follow when we come to carving, but we’ll get to that. The skin is very good, with just enough marks and texture variance to give us a good run at the exercise. Remember that with high end commercial retouching you’re going to be getting professional models with great skin, great lighting, make up, wardrobe etc. It isn’t about changing the shot, or the model, it’s about perfecting it. Here’s a close up of the kind of texture variations I mentioned.
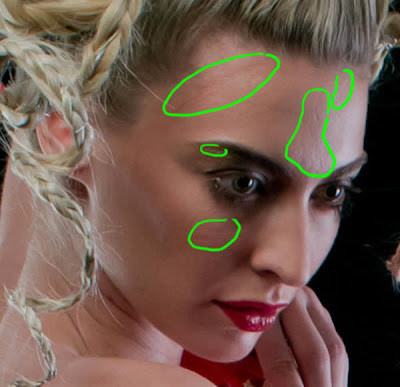
It might be instinctive to head straight for the clone stamp or healing tools, but the clone stamp will carry luminosity and tone with it, causing problems in light to shadow or vice versa. The healing tools carry the texture and then attempt to approximate the tone and luminosity with an algorithm. What if there was a way of cloning nothing but the texture,ignoring the luminosity and tone, and simply replacing a piece of texture elsewhere? Well we’ve got one, and it’s called frequency separation. (Read More)
Final Image
Take a look at the picture which we are using for this tutorial. Client might give you a typical example of markup image below. It might be a jpeg or scan of a pen-annotated print or just a set of directions or suggestions, but ultimately you’ll be expected to deliver on a set brief.
We have instructions to clean up the image, a little liquefy for a more pleasing curve to the back and waist, and to remove the purple-blue tone from the model’s legs. I’ll cover the techniques you’ll need to complete the shot over the course of several tutorials. Remember not to deviate too far from what your client is asking for, run it by them first. If you think a background color change is really going to make the subject pop, try discussing your ideas, especially if it’s for a portfolio project. If it’s a commercial or editorial job however and the art director wants neutral white, he or she of course, gets white.
There are quite a few ways to achieve a similar result in Photoshop, and I’ll be going through a number of them, often focusing on one in particular and giving a couple of alternatives you might want to try.
The first step we’re going to follow in completing this shot is the healing, the ‘basic cleanup.’ For this we’re going to be mostly using the clone stamp (S), but we’ll do it a little differently to the way the software intended. Be sure to start off using the key commands for your tools, you’ll save yourself a lot of time in the long run. When you’re trying to meet an unreasonable deadline and your left hand is bringing up every tool and command without giving it a thought you’ll thank me for it. Take a look at the look at the shot we have to work with.
The lighting’s a blessing, the well defined shadows and highlights give us a great guide to follow when we come to carving, but we’ll get to that. The skin is very good, with just enough marks and texture variance to give us a good run at the exercise. Remember that with high end commercial retouching you’re going to be getting professional models with great skin, great lighting, make up, wardrobe etc. It isn’t about changing the shot, or the model, it’s about perfecting it. Here’s a close up of the kind of texture variations I mentioned.
It might be instinctive to head straight for the clone stamp or healing tools, but the clone stamp will carry luminosity and tone with it, causing problems in light to shadow or vice versa. The healing tools carry the texture and then attempt to approximate the tone and luminosity with an algorithm. What if there was a way of cloning nothing but the texture,ignoring the luminosity and tone, and simply replacing a piece of texture elsewhere? Well we’ve got one, and it’s called frequency separation. (Read More)
Tags:


