

Step 1. Create a new document, size 630x900 and fill it with it a light, warm gray (color code #e4e4e4).
Step 2. To make the final result make more realistic, it’s necessary to mimic the way you can see the writing on the back page on a real newspaper.
To achieve this effect, open an image of a newspaper page you can find on the Internet (I chose this one), go to Image-> Rotate Canvas -> Flip Canvas Horizontal and then copy/paste it over the new document you just created. Set its opacity to 5%, so that the writing is only a bit visible.

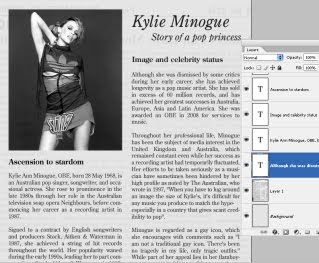
Step 3. Newspaper articles often contain pictures, so I opened this one and resized it to 35%, and I placed it on the left like this:

Step 4. To convert the image to black and white, the best method is to go to Image -> Adjustments -> Channel Mixer… tick Monochrome and leave all the other settings as default.

Step 5. In order to create the headlines, I used Century Old Style Std, Italic, size 40pt and 24pt respectively. You may use any other font that is very legible and simple.

Step 6. To create the subtitles, I used Century Old Style Std, Bold, size 18pt. I left some space between them and the picture, and the headlines, in order to achieve an elegant, uncluttered look.

Don’t worry if the text you’ve done until now is not properly aligned. You can easily fix that later.
Step 7. Now it’s time to create the content of the news article. You need to create a text box: using the Type Tool, click on the desired starting point of the text box and drag down to create a rectangle.

Though it’s not visible in the screenshot above, the text box doesn’t go all the way to the bottom of the page. I’ve left a blank edge on the bottom of the page, because we’re later going to add the date and day of the week there, just like on genuine newspapers.
Step 8. Paste some text of your choice into the text box you’ve created (my source was Wikipedia). The font I used is Century Old Style Std, Regular, 14pt.

Notice that I’ve used a Sans Serif font. Because of their high legibility, most magazines and newspaper articles use Sans Serif fonts for the main body of text.
Step 9. Create a second text box as shown at step 7 and paste some text, using the font at step 8.
Step 10. The final step is to create a text box and add some text in the lower part of the page. I used the font Century Old Style Std, Regular, 12pt.

In order to verify and align the way the text and pictures fit on the page, go to View -> Show -> Grid. To change the position of a certain element, use the left and right arrow keys, or the Move Tool.
The final result:
Tags:
1 comments: on "How to Create Newspaper Layout In Photoshop"
Nice touch with print from the other side of the paper. Hadn't thought of that :-)
Post a Comment