1. Open the photo/file in Photoshop you want to work with for the tutorial (go to the file menu in Photoshop and select open, from the open dialogue box select your desired file and click open.
2. Make a duplicate layer of the image by going to the layer palette and clicking & druging the background layer into the "Create a new Layer" box (located at the bottom of the layer palette and 2nd one from the right hand side). Take off the original background layer by clicking on its visibility icoon. This way we can preserve the original layer and will be working with the duplicate one. Look at the picture below to get a live view.


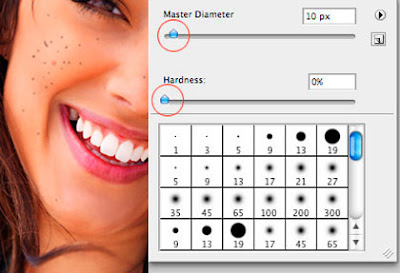
3. Select the "Clone Stamp Tool (S)" from the tool box (if you can't see the tool box, go to window menu and select "Tools"). Click right button on your mouse and an window will pop up where we can resize the clone tool depending on the spot size we are going to remove and as well as the hardness we need to select into 0% in this case. Now we are ready to start retouch and cleaning the spots.


4. Keep in mind that we have to clean every single spot one by one. Not all spots we can remove at a single click. So, decide which perticular spot you are going to touch up first, then press "Alt" on your keybord and click on the fresh portion of the image nearest to the spot where you think the color density is very similar. Release the "Alt" key and click on the spot. You are successfully removed the spot. Take a look at the image below.

5. In the same manner, touch up all the spots within the image.
One thing I want to notice that, make your tool size perfect (a little bit bigger than spot) and choose the appropriate hardness of the tool. If these things are not choosen appropriately, your image may not look professional after you have done.
Hopping the above tutorial helps you to handle retouching in photoshop.

0 comments: on "Photoshop - Simple Photo Retouching Tutorial"
Post a Comment