Custom Search
Showing posts with label Photoshop Tutorials. Show all posts

Tuesday, July 17, 2012

Creating a Stunning Sci-fi Illustration Using Photoshop and Poser

In today’s tutorial We will walk you from beginning to end of the entire process of setting up and rendering a 3D . we will show how to flawlessly blend 3D renders with stock images using digital painting techniques to create a stunning sci-fi illustration. So don’t be anxious if your drawing skills are not you’re strongest quality – in fact, Poser was originally developed as a practical dummy to assist artists and comic book creators, so let’s get on track!
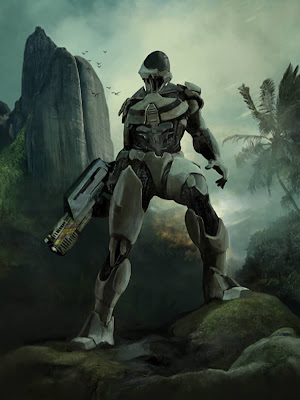
Creating a Stunning Sci-fi Illustration Using Photoshop and Poser

Step 1
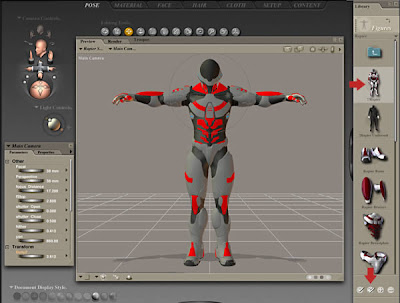
Launch Poser, select the default figure in the main viewport and hit delete. Go to Library > Figures > Daz People > Michael 4, highlight the thumbnail and click the Create New Figure tick at the foot of the palette to load the model. At this stage were not concerned with textures, so select Smooth Shaded under Document Display Style.
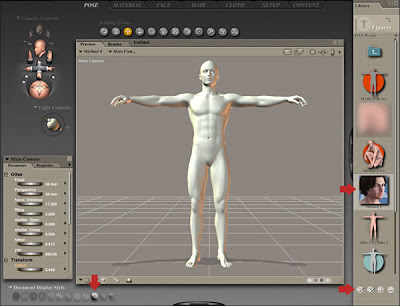
Creating a Stunning Sci-fi Illustration Using Photoshop and Poser

Step 2

Select the Coalition Rapier library (found under Figures > Mestophales > Coalition > Rapier). Select the top Rapier icon and click the Create New Figure double-tick icon. Ensure the suit is selected, then choose Figure > Conform To and select Michael 4 in the following window to make the suit follow the figures movements.
Creating a Stunning Sci-fi Illustration Using Photoshop and Poser

Step 3
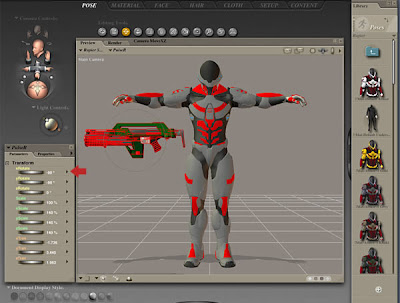
With the suit still selected, choose Pose > Mestophales > Coalition > Rapier and highlight the Mat-Armor-1 Olive thumbnail, then click the Apply Library Preset tick. Now to add the weapon. I found this pulse rifle in old library, but you can easily use something similar from DAZ3D such as these sci-fi rifles.
Load the weapon, mine is not a Smart Prop, so I had to use the Transform Parameter dials to rotate and position it just below the figures right arm.
Creating a Stunning Sci-fi Illustration Using Photoshop and Poser

Step 4
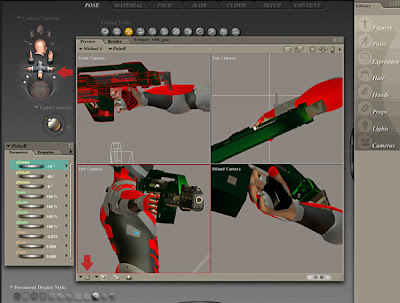
Select Four Ports from the bottom-left pull-down menu and use the Camera Controls to access the best position/angle to view the right hand and weapon. Now fine-tune the Transform Parameter dials to accurately position the weapon.
Creating a Stunning Sci-fi Illustration Using Photoshop and Poser

Step 5
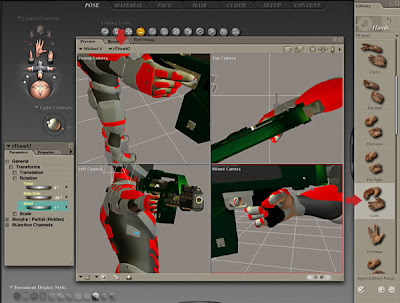
Select Michael’s right hand and apply the Grab preset pose (Library > Hands > P6 Male). Now select each individual finger/thumb mesh in turn and adjust them to grasp the trigger and handle.
Creating a Stunning Sci-fi Illustration Using Photoshop and Poser
Read More

read more...

Sunday, May 27, 2012

How To Create Media Player Design In Photoshop

In this tutorial we’ll teach you how to create a Media Player Interface in Photoshop.

Step 1

How To Create Media Player Design In Photoshop

Create a new file 398×398 pixels. Using the Layer Style on the background select Gradient overlay and make the colors #016497 and #6bd3f5.

Create a new file, with the Paint Bucket tool fill the layer black. Go to Filter > Noise > Add Noise (make it 20%). Make the layer opacity 14%.

How To Create Media Player Design In Photoshop

Select the Round Rectangle Tool and create the main shape for the Media Interface. Double click on the layer to bring up Layer Style, go into Gradient Overlay and make it these colors: #000000 and #2e2e2e. Select Stroke and make the size 1px and color #000000.

How To Create Media Player Design In Photoshop

Hold down the ctrl key and Layer Thumbnail containing the box, this will highlight the box. Create a new layer and fill the box shape it white, press the right key once to move over the highlighted shape and press delete. You should have a thin line on the side of the box. Get the eraser tool with the soft edge and make the opacity 60%. Lightly erase the top and bottom edge of the line to make a shiny edge effect.

How To Create Media Player Design In Photoshop

Do the same step to the right side of the box.

How To Create Media Player Design In Photoshop

Select the Rectangle Tool and create a box in the middle of the previous box like above. Open up the Layer Style to the layer, select Gradient overlay and make the colors #000000 and #2e2e2e.

How To Create Media Player Design In Photoshop

Like the previous step do the white lines to this new square layer.

Step 2

How To Create Media Player Design In Photoshop

Select the rounded rectangle tool and draw a rectangle. Holding down the ctrl-key, press down on the bottom right corner and move to the right. Do the same move with the bottom left side of the other side. Make sure the bottom is even.


Holding down the ctrl-key and layer box selecting the rectangle shape. Go to Select > Modify and Expand by 2 pixels.

How To Create Media Player Design In Photoshop

On the new layer open up the Layer Style > Select Gradient and make the colors from bottom to top #454545 #626262 #646464 & #222222. Select the Stroke tool make the size 1px, color #oooooo and opacity 71%.

How To Create Media Player Design In Photoshop

Holding down the ctrl-key select the rectangle box layer to select the shape. Create a new file to go underneath the rectange shape and fill it #FFFFFF. Press ctrl and press the up arrow once to make it viewable on top of the rectangle shape. With the eraser tool on a 60% opacity, slightly erase the edges.

How To Create Media Player Design In Photoshop

With the Zoom Tool enlarge the panel area. Select the line tool, make it 1px. With the colors black and white draw 2 lines side by side. Rasterize both layers and merge them into each other (press ctrl E on the top layer).

How To Create Media Player Design In Photoshop

Using the eraser tool slightly erase the top and bottom of the line.


Zoom out and duplicate layer to make 4 lines.

How To Create Media Player Design In Photoshop

Using triangle shapes and square shapes create little icons for the media player. For each shape make the gradient #385870 #bbdbf3 and 45657d.

How To Create Media Player Design In Photoshop

Select the rounded rectangle tool and make a shape like the one in this picture. Go into Layer Styles > Gradients Overlay and make the colors #4daaf2 and a3d7ff. Select stroke, make it 1px and the color #000000.

How To Create Media Player Design In Photoshop

Holding down the ctrl key click on the rectangle layer to select the shape.


Click on the Elliptical Marquee Tool and while press ALT key select the area of the rectangle you wish to go away to make it look like the shape in this image.


Make a new layer and fill in the shape white, then make the opacity for that layer 11%.

How To Create Media Player Design In Photoshop

If you wish to put a scene from a movie in the player, get a image you. Place it in the centre of the screen, hold down on the ctrl key and select the rectangle screen shape.Selecting the image layer press ctrl+x, then delete the image layer. Press ctrl + P which should paste the new image on a layer. Place the image underneath the reflected shape and make the opacity 78%.

How To Create Media Player Design In Photoshop

Zoom in to the image, select the color #0a4579 and with the pencil tool draw a speaker shape.


Select the brush tool and with the same color draw 2 circles, then copy and paste the circles to make more. Make sure everything is even.

How To Create Media Player Design In Photoshop

Put all the media interface files (excluding the background) in one folder. Duplicated the folder, right click on the new folder and select Convert to Smart Object. Right click on the file again and press Rasterize Layer.

How To Create Media Player Design In Photoshop

With the duplicate layer selected press ctrl+T (make sure when you do this the Marquee Tool is selected), pull down the image to make it look like the screenshot above.

Make the layer opacity 49% and select the eraser tool. With a soft edged eraser at 70% erase the bottom of the image.

How To Create Media Player Design In Photoshop

Lastly with the layer still selected go to Filter > Blur > Blur to make the image slightly blurry. Do this a number of times to get your desired effect.


Here’s the final Result


read more...

Thursday, May 24, 2012

Photo Retouch Using Split Frequency Healing In Photoshop

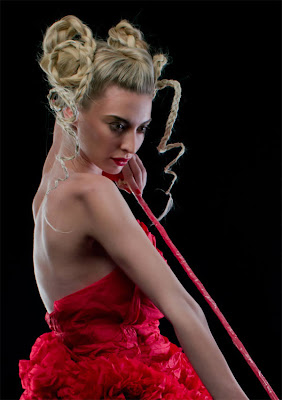
Split Frequency Healing is a method that you can apply in Photoshop that will allow you retouch photos without affecting the photo’s relevant tone or texture. In this tutorial, commercial retouch artist, Daniel Meadows, who has worked for clients such as Harper’s Bazaar, Elle, Marie Claire, Chanel, and L’Oreal Paris, will elucidate this technique and how it can be used in your workflow.

Final Image

Photo Retouch Using Split Frequency Healing In Photoshop

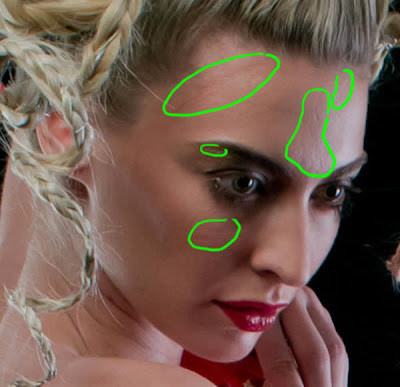
Take a look at the picture which we are using for this tutorial. Client might give you a typical example of markup image below. It might be a jpeg or scan of a pen-annotated print or just a set of directions or suggestions, but ultimately you’ll be expected to deliver on a set brief.

Photo Retouch Using Split Frequency Healing In Photoshop

We have instructions to clean up the image, a little liquefy for a more pleasing curve to the back and waist, and to remove the purple-blue tone from the model’s legs. I’ll cover the techniques you’ll need to complete the shot over the course of several tutorials. Remember not to deviate too far from what your client is asking for, run it by them first. If you think a background color change is really going to make the subject pop, try discussing your ideas, especially if it’s for a portfolio project. If it’s a commercial or editorial job however and the art director wants neutral white, he or she of course, gets white.
There are quite a few ways to achieve a similar result in Photoshop, and I’ll be going through a number of them, often focusing on one in particular and giving a couple of alternatives you might want to try.
The first step we’re going to follow in completing this shot is the healing, the ‘basic cleanup.’ For this we’re going to be mostly using the clone stamp (S), but we’ll do it a little differently to the way the software intended. Be sure to start off using the key commands for your tools, you’ll save yourself a lot of time in the long run. When you’re trying to meet an unreasonable deadline and your left hand is bringing up every tool and command without giving it a thought you’ll thank me for it. Take a look at the look at the shot we have to work with.

Photo Retouch Using Split Frequency Healing In Photoshop

The lighting’s a blessing, the well defined shadows and highlights give us a great guide to follow when we come to carving, but we’ll get to that. The skin is very good, with just enough marks and texture variance to give us a good run at the exercise. Remember that with high end commercial retouching you’re going to be getting professional models with great skin, great lighting, make up, wardrobe etc. It isn’t about changing the shot, or the model, it’s about perfecting it. Here’s a close up of the kind of texture variations I mentioned.

Photo Retouch Using Split Frequency Healing In Photoshop

It might be instinctive to head straight for the clone stamp or healing tools, but the clone stamp will carry luminosity and tone with it, causing problems in light to shadow or vice versa. The healing tools carry the texture and then attempt to approximate the tone and luminosity with an algorithm. What if there was a way of cloning nothing but the texture,ignoring the luminosity and tone, and simply replacing a piece of texture elsewhere? Well we’ve got one, and it’s called frequency separation. (Read More)

read more...

Tuesday, May 22, 2012

Photoshop CS6 With New Oil Paint Filter

Photoshop CS6 With New Oil Paint Filter


Photoshop CS6 introduces some new filters which are very powerful tool in Photoshop. It will help you to apply quick effects to your images. The new Oil Paint filter in Photoshop CS6 will give any image a painted look. In this tutorial, we will introduce you to this new filter. So let’s explore it..


read more...

Tuesday, September 7, 2010

How To Create Sunny White Clouds In Photoshop

Create the Sky
Lets start by creating a new document which is 1024 x 768 pixels at a resolution of 300 pixels/inch, make sure Color Mode is set to RGB
.

Create the Sky
Set your Foreground Color to #a4cccc and Background Color to #5ebbd5. Get the Gradient Tool, pick Foreground to Background gradient and fill the Background with a Linear gradient from bottom to top
.

Apply Clouds Filter
Create a new layer and name it "Clouds". Hit D on the keyboard to set colors to Black and White. Go to Filter > Render > Clouds. Set Layer Blend Mode to Screen.

Add Layer Mask
Click the Add Layer Mask button on the Layers Panel. Go to Filter > Render > Clouds to apply a clouds filter to the layer mask
.

Apply Curves to Layer
At the moment the Layer Mask is selected in the Layers Panel. Go back to "Clouds" layer by clicking the Layer Thumbnail. Hit Command+M to bring up the Curves dialog
and tweak the curve as in the below image.

Apply Levels to Mask
Now select the "Clouds" Layer Mask and hit Command+L to open the Levels dialog and increase the contrast as shown in the below image.

Some Blur
Go to Filter > Blur > Radial Blur while the Layer Mask is still selected. Use these settings: Amount => 50, Blur Method => Zoom, Quality => Best. You can also change the position of the Blur Center.
.

Let the Sun Shine
Now let’s put some sunshine. Create a new layer on top and fill it with Black
. Go to Filter > Render > Lens Flare, set Brightness to 175, pick 50-300mm Zoon lens, place the Flare Center at the top left of the canvas and hit OK.

Congratulations
Set Layer Blend Mode to Screen. This is my final image.
Because we’re using clouds filter each time you repeat this tutorial you’ll get different results, the Curves and also the Levels adjustments will also change the final image. Hope you liked this tutorial and had fun making it.


Source
read more...